Behind the vast majority of today’s great digital photos there is also great editing. Whether it’s as simple as cropping to shift the focus of the image or adjusting brightness, contrast, saturation and other details, the editing process can be time-consuming and intense for photographers.
However, this process is also what can take average photos and turn them into stunning ones… That is, if you’ve got the right tools and you know what to do with them.
Which is exactly why we’ve put together a list of top 10 photo editing hacks for your perusal!
1. Always remember the rule of thirds.
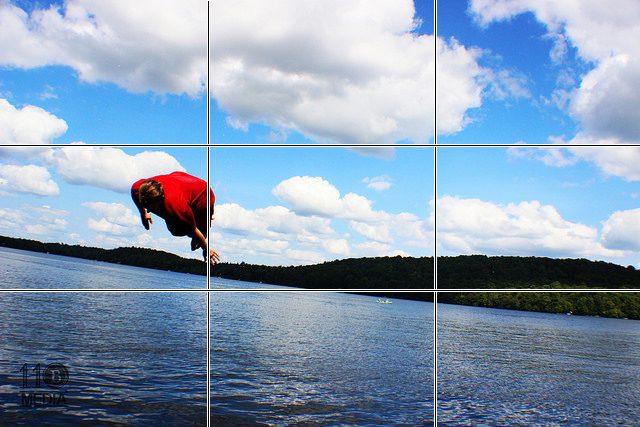 The rule of thirds is absolutely essential to composing a great photo. At its simplest, the rule of thirds can best be explained with a grid. Take this image on the right as an example.
The rule of thirds is a basic principle of art that suggests the subject or most interesting point of an image should be placed along one of these grid lines, which in theory make the photo more appealing, balanced and naturally readable. Notice how the subject in this photo is very much weighted on the left, but without the grid lines, the image still appears balanced.
When you’re doing any sort of event photography where people are essentially moving targets, perfectly framing a shot like this can be borderline impossible. Which is why some genius came up with the concept of cropping!
Cropping is your friend, my friends, and it’s also one of the biggest, most widely used editing tools because it allows you to frame exactly the shot you want. I’ve always found that I’ll end up with lots of center-weighted shots that I’ll quickly adjust right off the bat in post-production.
Keep the rule of thirds in mind when you’re processing images because you might find that adjusting the crop to place a subject more to the right or left can have a huge impact on the overall look and feel of a photo.
2. Find the balance of light and dark.
While this note goes without saying, contrast between light and dark is one of the most tricky balances to find as a photographer and rarely will you ever capture it perfectly in the moment it happens.
Adjusting this balance can be done in a few, simple ways, namely in adjusting brightness and contrast. Sometimes high contrast images can be exactly what you’re looking for, other times you may find that decreasing the contrast brightens up darker areas of the image that might otherwise be difficult to edit.
The bottom line is simple: Great photographs incorporate a wide range of extreme light and extreme dark. By this I mean pure white all the way to deep dark black. This range makes photos more interesting and appealing whether they’re in color or black and white.
3. Play with saturation, but don’t go overboard.
In my observations, saturation is one of the first things new photo editors go absolutely wild with. The problem is that going wild with saturation can produce horribly unnatural looking photos… and unless that’s what you’re going for, it’s probably something you should try to avoid.
That little disclaimer being said, saturation can be a huge help in making colors in an image more vibrant and more defined.
But like I said, don’t get carried away with this.
4. Dodge and burn subtly, carefully.
For those of you who are new to photo editing, dodging is a technique and tool in Adobe Photoshop used to lighten specific areas in an image. On the flip side, burning is a technique used to darken areas of an image.
Today, the dodge and burn tools are used almost like paint brushes to lighten or darken parts of an image by changing the exposure.
Back in the old days, dodging and burning was a physical process. To dodge an image, you would use an object that eerily resembled those spoons used by nurses to cover your eye during an eye exam. Using this spoon wand thing-a-ma-jig you would go into the dark room and begin exposing the photo paper, waving this little thing around to brighten up spots of a photo that look dark.
Today that concept is fully translated into the digital world. But there’s one catch: in the digital world, image quality always drops dramatically the more you change the exposure (i.e. burning or dodging).
Here are some other great tips for how best to dodge and burn.
5. Brighten shadows by lessening the contrast.
As mentioned before, contrast can be a wonderful thing, but it can also cause some serious problems, like emphasizing shadows in faces. One very simple trick to help lighten those shaded areas is to lessen the contrast right off the bat. This will instantly help brighten up some of those unseemly shadows.
6. Dabble in black and white with high contrast images.
Black and white photos aren’t for everyone, but you should definitely give it a try, especially with images that might be a little blown out or generally high contrast. Generally converting these images into grayscale mode or lessening the saturation can create a really cool look (and save some otherwise not-great photos).
7. Color balance is everything.
Have you ever seen pictures that look horrendously yellow? Ones that are way too warm-colored or way too cold?
Here’s a simple thing to keep in mind: white should always look white, no matter what the lighting.
Now, that is much easier said than done since any unnatural light can produce a range of unwanted color variances in your photos. A smart thing to do if you’re going to be shooting in one of these locations is to adjust your camera’s white balance. This will help, but it might not be perfect, which is why it’s always something you should look to balance when you’re editing your photos.
8. Filters are fun but can also be gimmicky.
The days of impressing your friends with photos filtered to look like handdrawings are all but over. But, any Photoshop Pro will tell you that filters can also be used for good.
Using filters in Photoshop you can add blur, noise (or remove noise), sharpen images (which should only be done once you’re finished with everything else), or even lens flare.
Some of it can be gimmicky, but you should never be too old to stop playing around and trying new things.
9. For advanced Photoshop users, play with curves!
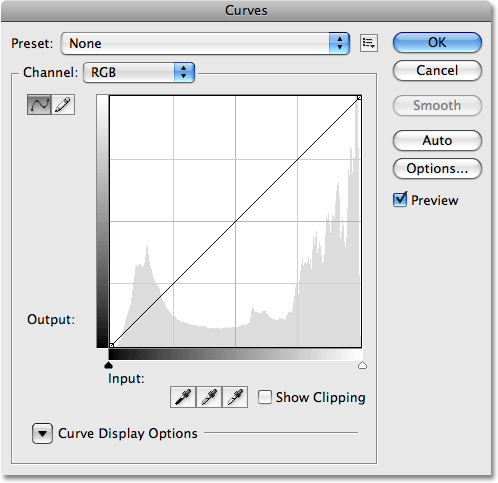 Curves are an incredibly powerful tool in Photoshop as it essentially manipulates tone and contrast at once. Even for someone who’s been using Photoshop and editing pictures for over 10 years, the Curves feature is probably the most difficult to master.
The way Curves work is by representing the overall tonality of an image with a diagonal line and the range of highlights and lowlights graphically below it. By changing the shape of the diagonal line, you’re easily able to adjust highlights and tone with minimal damage to the original image.
10. Keyboard shortcuts = expert level.
For those super-savvy Photoshop Pros, take your game to the next level by learning some super cool keyboard shortcuts. They’ll save you much needed time and frustration when it comes to flipping between cropping and a paint brush… Oh, and if you already know them, you are just a super cool person. Congratulations on that.
HAPPY EDITING!
-ML

